Laptops may account for the bulk of computer sales, but it’s hard to argue against the advantages of a big screen, especially when you have to juggle multiple apps at the same time. A big, high-resolution display opens up possibilities that even the biggest laptops cannot aim to match.
And they don’t come much bigger than the monitor we’ll be reviewing today. We’ve had the chance to spend a few weeks using the Philips BDM4350UC, a 43-inch 4K LCD monitor, to see whether a really big screen can turbocharge your productivity. Could this be the monitor of your dreams? It’s time to find out.
Philips BDM4350UC design and specifications
Given its size, it’s no surprise that the Philips BDM4350UC resembles a television more than a traditional monitor. In most cases, monitors — except ones with atypical aspect ratios — look like smaller televisions, save for the fact that most of them have stands that let you adjust their position in ways that televisions aren’t designed for.
But the Philips BDM4350UC looks just like any television of its size. In fact, installing this monitor involves fixing two legs stick out quite a bit on either side of the monitor, just like we’ve seen with large-screen televisions by the likes of Xiaomi and others. We didn’t have a table large enough to accommodate this monitor fixed to its legs, so we decided to leave them in the box.
Thankfully, the monitor is still stable enough to stand on its own without any problems, and that’s how we used it for the entire duration of our test period. Though there’s a slight tilt to the back when it’s in this position, it’s definitely not as stable as it would be with the legs, and we don’t advise using it like this out in the real world. With or without the legs, there’s no way to adjust the height of the monitor, nor do you have the option to tilt or swivel the display in any way, which is a bit of a change from many popular standard-sized monitors.
The sheer size of this monitor is something you’ll need to keep in mind before purchasing it, as physically, it may not just be a plug-and-play replacement for, say, the 24-inch monitor you’re currently using. It does have a standard 200x200mm VESA mount for wall-mounting, or for a third-party VESA stand that could enable tilt and swivel adjustment that the monitor lacks by itself.
The bezels aren’t particularly large, but this is no edge-to-edge monitor, and one could argue that it doesn’t need to be because of its sheer size. We never really noticed the bezels, probably because there was so much screen real estate occupying our field of view. The overall design looks and feels premium, and this monitor is nothing like most of the budget televisions that we’ve seen recently.
A small plasticky piece jets out from the centre at the bottom. This piece features a Philips logo and a small LED that stays on without attracting any attention when the device is powered on, and strobes gently when it is in standby mode.
All the ports are at the back, on the left-hand side (as you reach backwards from the front) near the bottom, except for the power inlet which is on the right. You get two HDMI 2.0 ports (with MHL), two DisplayPort 1.2 ports, and a VGA port for input. Additionally, you get four USB 3.0 ports, one of which is listed to support “fast charging”, and a USB-in port to connect the monitor’s USB ports to your computer. Audio-in and audio-out (3.5mm) ports are also thrown in for good measure. As we noted, all these ports face outwards, which did not prove to be a problem for us, but it might be a concern if you wish to wall mount this monitor.
 The Philips BDM4350UC offers plenty of ports
The panel measures 42.51 inches (108cm) diagonally, which allows Philips to market this as a 43-inch monitor. The native resolution of 3840×2160 pixels is supported at up to 60Hz, with a claimed typical response time of 5ms. The peak brightness is said to be 300 nits, with a typical contrast ratio of 1200:1. The panel does not support HDR. There are two built-in speakers of 7W each, which sounds like a good idea in theory, and we’ll soon find out how they perform in the real world.
The monitor also supports picture-in-picture (PIP) and picture-by-picture (PBP) modes that let it display input from more than one device at the same time. There are no buttons at the front — there’s only one joystick-style button at the back near the bottom right that’s used to control all settings. It takes some getting used to the positioning and functioning of this button, but after a couple of days with the monitor we were reaching out for it and adjusting settings blind without any problems. A power button that can be flicked to turn the monitor on or off is also located at the back, though it’s not as easy to reach.
Philips BDM4350UC performance
In this section, we’ll focus on two main areas — the first, how it is to use a monitor of this size on a day-to-day basis, and the impact it can have on your productivity. The second is the performance of this panel itself, in which we will look at some benchmarks and other formal tests.
We connected the monitor to a Mac mini, and macOS defaulted to the native 4K resolution. We had no problems reading text and most other on-screen elements, so we didn’t bother scaling down to a lower resolution, though your mileage may vary. The only UI elements that seemed a bit too tiny for our comfort were the menu bar near the top right corner of the screen. Switching to 3200×1800 resolution resulted in a better experience.
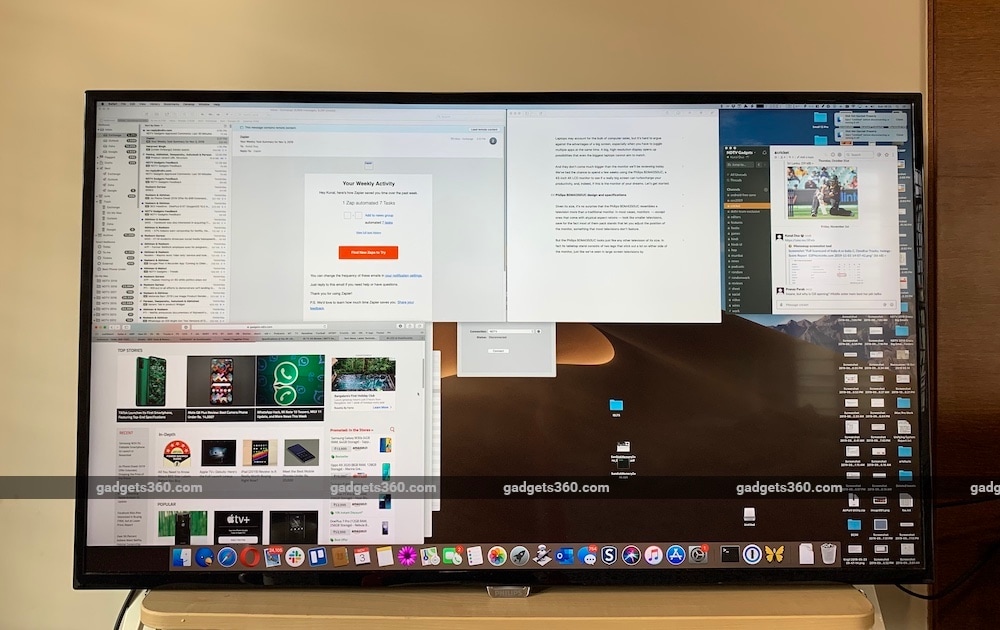
With that said, we loved the extra pixels that the native resolution offers and switched back to it in no time, deciding to live with the slight discomfort of smaller menu bar icons. As you would expect, the 4K panel at its native resolution gives you an enormous amount of real estate, and as someone who’s constantly juggling multiple windows, we decided to make the most of it.
We dedicated one part of the screen to our email client, another to the browser, one to Slack (our chat application), and another to Google Analytics, which we love keeping an eye on in real time. We still had plenty of real estate leftover for other windows. While it was great being able to keep tabs on so many applications at the same time, we did notice some patterns in our usage.
Despite having all the additional pixels, we tended to position the “main application” — i.e. whatever we were focussing on at the time — near the bottom-left of the screen. So, while the mail client’s message list window stayed on the top-left of the screen, we composed emails near the bottom-left (thankfully the macOS Mail app remembers the winndow’s position after you’ve dragged it once). We found that the top half of the display was largely useless for anything other than monitoring apps that require an occasional glance.
While the ability to have large documents display on the screen in a tall window sounds good in theory, we found that looking at the top one-third (at least, if not the top half) of the screen for long requires too much effort, and it almost feels like watching a movie from the front row. We think that everyone will end up having “sweet spots” where most of the action takes place, with everything else in the periphery.
There are some other problems that arose due to the quirks of macOS combined with our usage habits. Notifications from Mac apps show up in the upper-right corner of the screen, and this is a behaviour that cannot be changed (other than disabling notifications altogether, of course). This means that if you’re focused on the bottom-left of the screen like us, it is all too easy to miss notifications due to the sheer size of this display. Even when we did manage to catch them, at times it seemed like too much effort to shift our attention to the top right corner and then back again to what we were working on.
We also booted into Windows on our Mac mini to see what the experience was like. By default, Windows resorted to 300 percent scaling, but we switched to 100 percent, and the experience was pretty similar to what we noted with macOS above. Text was sharp — even at 8-point size — and the overall experience was nothing like what you’d remember from hooking up your old, large-screen, non-4K TV to your computer a few years ago.
Of course to make the most of such a monitor, some people might need to change some habits. Many users who grew up using Windows are used to maximising their current window and using Alt-Tab to switch between apps. If you are someone who’s married to that working style, unless you are using apps like Photoshop or other pro-grade apps, you are unlikely to get much benefit out of a monitor of this size, and will likely see huge white (or black) bands on either side of your content.
Some of you might be worried about eye strain associated with using such a large display at relatively short distances. We didn’t experience any physical discomfort while using this monitor, but we’ve spent nearly every waking moment for the best part of the last 30 years in front of one screen or another, so we are probably not best suited to comment on the subject of eye strain and we recommend getting an opinion from a licensed medical professional instead.
As we mentioned earlier, diving into the monitor’s settings requires you to reach around for the joystick-style button, but we got used to it and the menu layout pretty quickly. The settings let you control basic stuff like the current input source, the picture format (widescreen, 4:3, or 1:1, though the latter seemed to have no effect and mimicked widescreen), colour temperature, gamma correction, brightness, contrast, and pretty much everything else you might expect (see images below).


 Philips BDM4350UC OSD settings
There are a bunch of standard features under Philips’ marketing names, such as SmartImage presets that are supposedly optimised for Movie, Game, and Office scenarios, and SmartResponse which is designed to optimise response time and reduce lag while gaming. We were fairly happy with the settings out of the box, but it’s good to know that the options exist for those who want a bit more control.
Our favourite part of the settings panel was the one related to PIP and PBP. The former gives you an inset that takes over a part of the screen. You can select which source gets to be the main input, and which gets to be the inset. You can customise its position(top-left, bottom-left, bottom-right, top-right) as well as size (small, medium, large), with the inset taking over a little less than a quarter of the screen at its largest size.
 PIP on the Philips BDM4350UC with an Apple TV in the inset
We found this to be useful while, say, working on the main screen while having an Apple TV connected so we could follow a cricket match while continuing to work. Yes, you can easily do this by having Hotstar open in a browser window on your machine, and both ways have their advantages and disadvantages.
We appreciated the ability to use the Apple TV remote to control the video we were watching without interrupting what we were working on, though the disadvantage is that we couldn’t control the exact positioning of the inset, the way you would a window on your computer. which means it can end up covering important on-screen elements. We wish there was a way to use the joystick to position the inset exactly where one wants.
PBP lets you position two, three, or four sources side by side, without any overlap. This didn’t appeal to us a lot, but your mileage may vary. It’s a nice way to have, say, the same computer and Apple TV running side by side so one doesn’t get in the way of the other. To get the most out of this mode, it’s best to have the resolution of your computer set to 1080p, as each input in PBP mode is being rendered in full-HD resolution.


 PBP with two, three, and four sources. We had only two devices connected, hence the repition.
In the PassMark MonitorTest Master Screen, running at native 4K resolution in the 16:9 ratio, the top left grille with a pixel spacing of one pixel appeared as a uniform grey colour instead of individual black pixel lines. We switched to 4:3 and could then see the individual lines. However, the centre circle which is expected to be a circle at 4:3 was more of an oval, while it appeared to be a perfect circle at 16:9. The opposite happened with the four smaller circles in the corners. We didn’t notice any blurring or smearing in the six coloured squares near the centre. Everything else on the screen was as expected as well.
The solid colour screens of the benchmark appeared fine, as did the Scale Black-Red and Black-Blue screens, though the Scale Black-Green appeared as a series of distinct vertical green lines of different shades, instead of one smooth gradient like in the other screens. In the Gamma Red, Green, and Blue tests, we noticed that the rectangular bar faded into the background at Gamma level 1.16. In the Fonts Test, the 6-point text was just about readable, with individual characters as distinct as we could expect them to be.
In the browser-based Eizo test, we noticed issues similar to PassMark on the opening screen, with the squares appearing as individual black and white lines in 4:3 resolution, but as a grey square at 16:9. We didn’t notice any defective pixels in any of the colours. In the uniformity test, we noticed that at 25 percent grey, the right half of the screen was brighter than the left, especially closer to the edge.
The monitor fared really well in the colour distances test, which means it can sufficiently differentiate between colours that are similar. Our colour gradients tests reported similar results to PassMark, with green being the only one that stood out as a little bit odd.
The Philips BDM4350UC excelled in the text sharpness test, with both White on Black and Black on White scenarios. However, the viewing angles test didn’t go as well, with noticeable changes in the sizes of the circles on screen as viewing angles increased. With that said, we didn’t notice significant degradation in quality when viewing content from odd angles in day-to-day usage. Eizo’s Gamma test indicated a value of 2.4.
We also spent a considerable amount of time using the monitor as a television, with a 4K Apple TV and an ACT Stream TV 4K media player connected to it. The monitor fared surprisingly well in this setup. Powering off the media player puts the monitor in standby mode, so we didn’t need to fiddle with the power switch. Power on a media player, and the monitor automatically switches the source to that input. The ACT Stream TV 4K media player has volume controls of its own, so we didn’t miss having a TV remote at all when using this as our video source.

The built-in speakers on the Philips BDM4350UC get loud enough to fill a large bedroom, and in all the time we spent with this monitor, we recall just one occasion when we wished they could’ve been louder, which could just be down to a poorly mixed show. Sound quality is good, and while there’s no real bass to speak of, the speakers are good enough to let you use this monitor as a standalone TV. You won’t need dedicated external speakers, though the audio-out port means you can do just that if necessary.
As far as picture quality is concerned, watching both HD and 4K content was pretty enjoyable, and while we didn’t have any complaints about the brightness of the panel, we did wish at times that the contrast ratio was a little bit better. In completely dark scenes, we also noticed a bit of “IPS Glow, especially near the right edge, though it wasn’t particularly bad. During the day, we found the glossy panel to be a bit too reflective at times, specifically when using the device as a television from a distance, though this wasn’t really an issue when we were sitting up close and using this it a monitor connected to our PC.
With a claimed response time of 5ms — and due to the fact that most PC graphics cards can’t drive 4K panels at their native resolution while offering consistent 60fps — this monitor isn’t targeted at gamers, so we didn’t run any formal gaming benchmarks. With that said, we did connect our Xbox to the monitor for a bit of gaming, and we were satisfied with the experience.
Verdict
There’s a lot to like about the Philips BDM4350UC. A 4K panel has the potential to greatly enhance your productivity, and this monitor delivers on pretty much everything it promises. Despite a few minor quirks, we didn’t find any major performance issues, and were more than satisfied with the overall experience. Creative professionals and others who can put the extra real estate to use will love what this monitor has to offer. We can also see this monitor being put to use in conference rooms as a high-resolution, all-purpose replacement for a projector, or on an office wall where the PIP/ PBP features can be used to display multiple sources at once.
However, as our time with the device showed, not everyone will be able to make the most of the extra pixels, and it’s easy to see in hindsight why many prefer using multiple regular-sized monitors next to each other instead of one giant 43-inch panel. Using such a large display as a monitor isn’t very practical and it’s easier to develop blind — or at least “non-preferred” — spots than when using a multi-monitor setup, as was the case in our usage.
With that said, if you are looking for a giant monitor that also doubles up as a television, the Philips BDM4350UC is a great bet. As much as we loved the PIP feature, even without that this monitor does a great job of being a television substitute, thanks to the good built-in speakers. All in all, we think this monitor will be a great addition to any home office where this kind of versatility could be particularly useful.
Price: Rs. 45,000
Warranty: 3 years
Pros
- Decent overall performance
- Plenty of inputs
- 4 USB 3.0 ports
- Built-in speakers are good
- Useful PIP and PBP features
- Doubles up as a nice TV
Cons
- Big panels aren’t great for all use cases
- Contrast ratio could be better
- Can be a bit too reflective at times
Ratings (out of 5)
- Design: 4
- Features: 4
- Performance: 4
- Value for Money: 3.5
- Overall: 4